Introductory Tutorial
Let us begin with a simple movie rental database called Pagila. Follow the instructions there to create a PostgreSQL database if you want to follow this tutorial along. Pagila is already fake data, but we shall pretend that it has sensitive data in it, and we are attempting to keep this data secure. We will imagine we have a strict protocol to follow to keep the data safe, and that the source database is only accessible from a private network.
You can give access to this database to a different user (I’m using tim) like this:
$ sudo -u postgres psql pagila
pagila=# grand pg_read_all_data to tim;
pagila=# \q
Minimal example
Let us begin in the private network that this sensitive data resides in (well, let us pretend anyway).
We being by setting the database connection information
(you don’t need to set SRC_SCHEMA if the schema is the default, but for explicitness we do here),
and creating the configuration, ORM and initial statistics files
(here we are imagining the username is postgres and the password is password – change postgres:password to the username and password you used to set up the database):
export SRC_DSN='postgresql://postgres:password@localhost/pagila'
export SRC_SCHEMA='public'
datafaker generate-config
datafaker make-tables
datafaker make-stats
This generates the files config.yaml, orm.yaml and src-stats.yaml.
Now we examine these files for evidence of sensitive information. There should be none, but any lines that are considered sensitive can be removed (as long as the file remains a YAML file!) before taking these files out of the private network.
Now outside of the private network we have these three files, and we can generate a new database.
Let us first create a new database within PostgreSQL.
Here we are using user tim and the default schema public:
$ sudo -u postgres psql
postgres=# create database fake_pagila;
CREATE DATABASE
postgres=# grant all privileges on database fake_pagila to tim;
GRANT
postgres=# exit
$ sudo -u postgres psql fake_pagila
fake_pagila=# grant all privileges on schema public to tim;
GRANT
fake_pagila=# exit
And let’s populate it with the fake data:
export DST_DSN='postgresql://tim:password@localhost/fake_pagila'
export DST_SCHEMA='public'
datafaker create-generators
datafaker create-tables
datafaker create-data
create-generators creates a Python file called df.py.
You can edit this file if you want, but it is much easier to edit config.yaml and call datafaker create-generators --force to regenerate this file.
You will notice that create-tables produces a couple of warnings, and PostgreSQL complains when datafaker tries to create the data.
The warnings are that datafaker doesn’t understand the special PostgresSQL types TSVECTOR and ARRAY, so it doesn’t know how to generate data for those columns.
Because it doesn’t know how to generate data for those columns it will just use NULLs, and the film.fulltext column cannot be NULL, so creating the data fails.
Fixing the errors with the minimal example
Now let us add text to the film.fulltext column. Find the film section and alter it like so:
film:
  row_generators:
  - name: generic.text.text
    columns_assigned: fulltext
Also, while we are at it let’s give the actors sensible names:
actor:
  row_generators:
  - name: generic.person.first_name
    columns_assigned: first_name
  - name: generic.person.last_name
    columns_assigned: last_name
We can see that we are setting the column we want changed with the columns_assigned property, but what does this name property mean?
This is a Python function that generates the random data for us.
generic. refers to the Mimesis generic provider that combines all the other Mimesis providers.
These all use the EN_GB locale, which currently cannot be changed.
Some examples of useful providers you can use are:
- generic.text. generates words, sentences, colours and more.
- generic.datetime. generates dates, day names, times and so on.
- generic.person. generates first and last names, genders, heights, occupations and so on.
Some of these functions take arguments, that we can assign like this:
customer:
  row_generators:
  - name: generic.person.email
    kwargs:
      domains:
      - gmail.com
      - ucl.ac.uk
      unique: true
    columns_assigned: email
(but only static booleans, strings or numbers)
Anyway, we now need to remake the generators (create-generators) and re-run them (create-data):
$ datafaker create-generators --force
$ datafaker create-data --num-passes 15
Now you can use psql --username tim fake_pagila to explore the data.
You will see that almost all of the columns have correctly-typed data in it.
All the foreign keys point to existing rows in the correct table without our having to do anything,
but also our nice new generators are working:
Our actor table has nice names in it, and our film table has text in the fulltext column
(albeit text that does not seem to describe films).
Problems with the minimal example
But here is a non-exhaustive list of issues with the data produced:
all text fields are just colours, for example: - staff names (we can deal with this the same way we dealt with actors names above). - address lines. - movie categories. - city, country and language names.
there are a lot of payment tables that are partitions of the main payment table in the source database, but these are just different tables in the generated table.
Fixing the problems with the minimal example #1: ignoring unwanted tables
We fix these problems by adjusting the config.yaml file.
We do not need to go back to the private network.
First, let us remove all the payment_ tables.
This lowers the fidelity of the generated database, but datafaker cannot cope with partitioned tables
so the best that we can do is pretend that payment is not a partitioned table.
If we think that our users will not be interested in this implementation detail then this will be acceptable.
So we edit the appropriate parts of the config.yaml file. You will see seven sections that look like this:
payment_p2022_01:
  ignore: false
  num_rows_per_pass: 1
  row_generators: []
  unions: {}
  vocabulary_table: false
We need to change ignore: false to ignore: true, and we can delete the other lines in these blocks if we like:
payment_p2022_01:
  ignore: true
payment_p2022_02:
  ignore: true
payment_p2022_03:
  ignore: true
payment_p2022_04:
  ignore: true
payment_p2022_05:
  ignore: true
payment_p2022_06:
  ignore: true
payment_p2022_07:
  ignore: true
Now we can destroy the existing database and try again:
datafaker remove-tables --yes
datafaker create-tables
datafaker create-data
We don’t need to regenerate the generators this time as we have not changed anything in the config.yaml file that affects generators.
Fixing the problems with the minimal example #2: generate vocabularies
While we could try to generate random plausible language, country, city and film category names, there is a better way.
As these tables hold no sensitive data, we can just copy them.
To do this, we need to change the config.yaml file and go back to the private network.
So let us find these sections in config.yaml and change vocabulary_table: false to vocabulary_table:true
(deleting the other properties if you like):
category:
  vocabulary_table: true
city:
  vocabulary_table: true
country:
  vocabulary_table: true
and later (although it doesn’t matter if you re-arrange the table blocks):
language:
  vocabulary_table: true
and now we take this file into the private network (or pretend to) and run (in the private network with SRC_DSN and SRC_SCHEMA set as above):
$ datafaker make-vocab --compress
This will produce four files: category.yaml.gz, city.yaml.gz, country.yaml.gz and language.yaml.gz.
If the --compress option is not passed it will produce .yaml files instead of .yaml.gz and this would be fine in this case.
Certain databases have very large vocabulary tables, for example the concept table in OMOP databases.
Such huge YAML files can cause problems, but they compress very well, so the --compress option can be very useful for overcoming such limitations.
Generating these huge vocabulary files can nevertheless take a very long time! Not in Pagila’s case, though.
Now your data privacy protocols will either require you to unzip and examine these files before taking them out of the private network
or it will trust datafaker to produce only non-private output given certain inputs.
In either case we take these files out of the private network.
Using the same config.yaml file outside the private network (and with DST_DSN set as above) we delete the existing data in these vocabulary tables,
and fill them with the new data from the yaml.gz (or unzipped .yaml) files:
$ datafaker remove-vocab
Are you sure? [y/N]: y
$ datafaker create-vocab
More In-Depth Tutorial
datafaker, or SSG for short, is a software package for synthetic data generation, focussed on relational data. When pointed to an existing relational database, SSG creates another database with the same database schema, and populates it with synthetic data. By default the synthetic data is crudely low fidelity, but the user is given various ways to configure the behavior of SSG to increase fidelity. This is done in a manner that maintains transparency and control over how the original data is used to inform the synthetic data, to control privacy risks.
In this tutorial, we go through the different mechanisms SSG has for configuring the data generation, and the different levels of fidelity they can provide and different kinds of utility they can have.
To showcase SSG, we will use the AirBnb User Bookings dataset, available at Kaggle.
The original dataset is a collection CSV files that can be ported to a relational database using this Python script (it requires having SSG previously installed).
The script assumes you have a local PostgresSQL server running at port 5432, username postgres and password password, with a database called airbnb to upload the data to.
These assumptions can be edited in the main function of the script.
After migration, the database has the following structure:
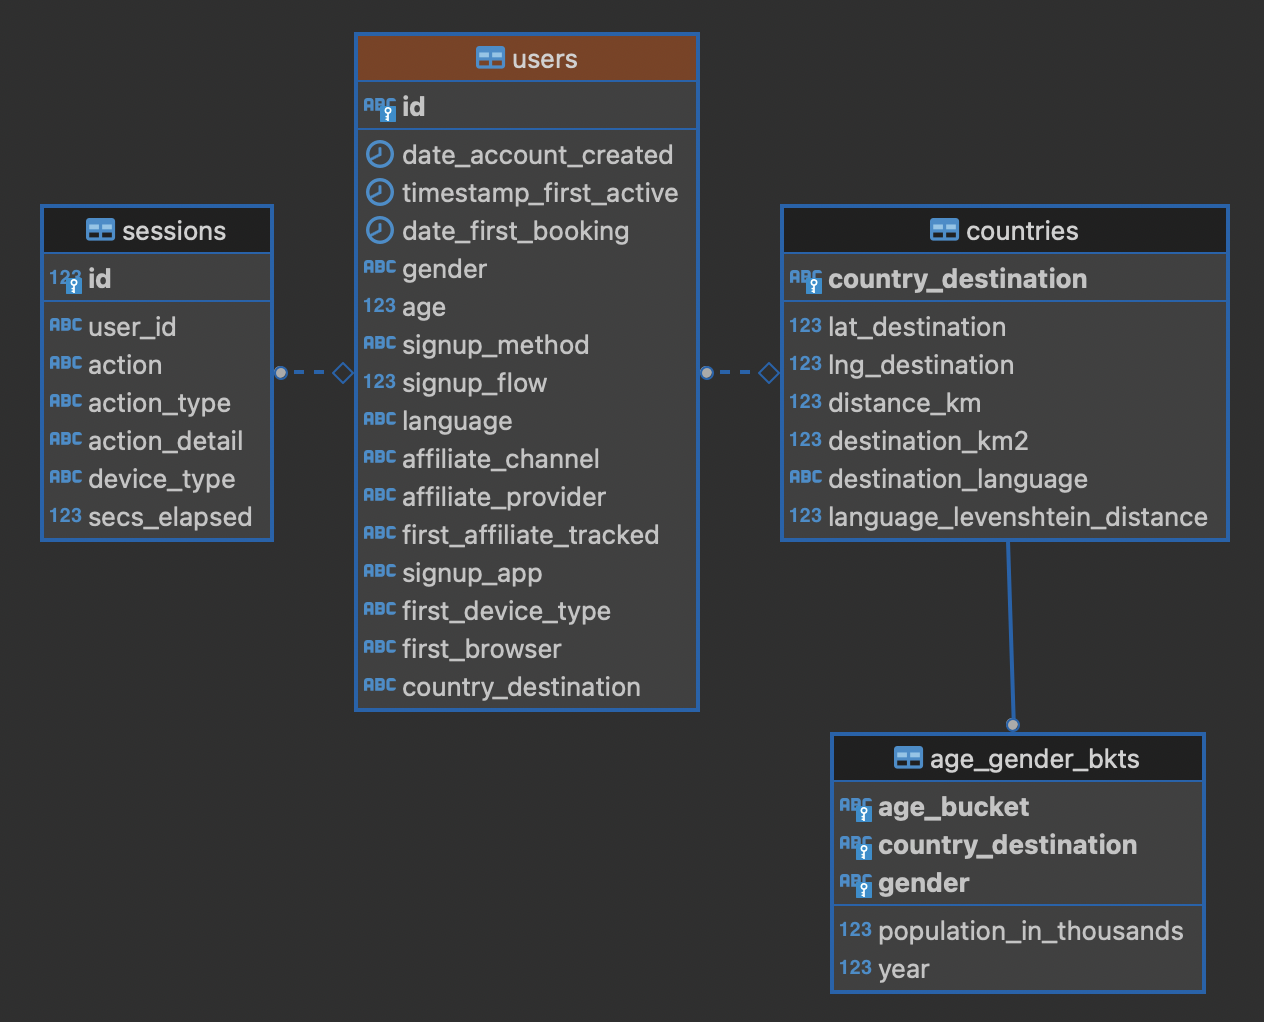
Default Behavior
SSG contains tools for replicating the schema of a source database.
Let us assume that the AirBnb data is contained in the airbnb database in our local PostgreSQL instance.
We would like to replicate its schema to the dst database, and generate synthetic data mimicking the records present on airbnb.
First, we need to provide SSG with the connection parameters, using a .env file like the following:
.env:
SRC_DSN='postgresql://postgres:password@localhost/airbnb'
DST_DSN='postgresql://postgres:password@localhost/dst'
We can start the schema migration process by running the following command:
$ datafaker make-tables
This command makes an orm.py file containing the schema of the airbnb database.
To use this file to replicate the schema in dst we run the following command:
$ datafaker create-tables
If you haven’t created the destination database, you may first need to run a command like createdb --host localhost --user postgres dst.
We can also use the orm.py file to make a Python module that generates synthetic data:
$ datafaker create-generators
This creates an df.py file that contains one generator class (not to be confused with Python generator functions) per source database table.
By default, without any user configuration, the data produced by these generators fulfills the schema of the original data:
the data types are correct and the foreign key and uniqueness constraints are respected.
SSG presumes that any primary keys it encounters will be auto-populated when a row is inserted into the table.
This is often true, for example, when a column is declared as the SERIAL pseudo-type.
However, this is not the case for the AirBnB dataset.
For example, the users table’s primary key id column is of type VARCHAR.
Running the next command, create-data, will produce an error:
$ datafaker create-data
...
psycopg2.errors.NotNullViolation:
To work around this, we will manually specify how the primary keys should be generated for the countries, users and age_gender_bkts tables by editing the ssg.py file:
On line 9 below we specify that the id column value should be created using a password Mimesis provider, which will give us a random string of characters.
ssg.py:
 1 class usersGenerator(TableGenerator):
 2     num_rows_per_pass = 1
 3
 4     def __init__(self):
 5         pass
 6
 7     def __call__(self, dst_db_conn):
 8         result = {}
 9         result["id"] = generic.person.password()
10         ...
The generic object on line 9 is an instance of the Mimesis type generic provider , the fields of which give access to all the providers Mimesis implements, and that SSG makes available within every ssg.py module.
Mimesis is a package for creating random data and has a wide array of providers (the Mimesis term for data generators) for different scenarios, which SSG makes extensive use of.
Similar edits as above for the users table need to be made for the primary key columns of the other tables.
See this Python file for the full changes to the ssg.py file.
Now when we run create-data we get valid, if not very sensible, values in each of our tables. For example:
age_bucket |
country_destination |
gender |
population_in_thousands |
year |
|---|---|---|---|---|
8k$X-en |
vQjTJ=p* |
1m>?l]”} |
485 |
534 |
SSG’s default generators have minimal fidelity: All data is generated based purely on the datatype of the column, e.g. random strings in string columns. Foreign key relations are respected by picking random rows from the table referenced. Even this synthetic data, nearly the crudest imaginable, can be useful for instance for testing software pipelines. Note that this data has no privacy implications, since it is only based on the schema.
Vocabulary Tables
The simplest configuration option available to increase fidelity is to mark some of the tables in the schema to be “vocabulary” tables. This means that they will be copied verbatim from the original source data into the synthetic data database. This should of course only be done for tables that hold no privacy-sensitive data, but rather hold fixed non-sensitive lists of concepts or facts that the rest of the schema references.
For instance, in the AirBnB dataset, the users table has a foreign key reference to a table of world countries: users.country_destination references the countries.country_destination primary key column.
Since the countries table doesn’t contain personal data, we can make it a vocabulary table.
Besides manually editing it, we can also customise the generation of ssg.py via a YAML file,
typically named config.yaml.
We identify countries as a vocabulary table in our config.yaml file:
config.yaml:
1tables:
2  countries:
3    vocabulary_table: true
The vocabulary tables are exported from the source database when the generator module is made, so we overwrite ssg.py with one that includes the vocabulary import classes, using the --force option:
$ datafaker create-generators --config-file config.yaml --force
This will export the countries table rows to a file called countries.yaml in your current working directory:
 1- country_destination: AU
 2  destination_km2: 7741220
 3  destination_language: eng
 4  distance_km: 15297.744
 5  language_levenshtein_distance: 0.0
 6  lat_destination: -26.853388
 7  lng_destination: 133.27516
 8- country_destination: CA
 9  destination_km2: 9984670
10  destination_language: eng
11  distance_km: 2828.1333
12  language_levenshtein_distance: 0.0
13  lat_destination: 62.393303
14  lng_destination: -96.818146
15  ...
We need to truncate any tables in our destination database before importing the countries data with:
$ datafaker remove-data --config-file config.yaml
$ datafaker create-vocab --config-file config.yaml --orm-file orm.yaml
Since create-generators rewrote ssg.py, we must now re-edit it to add the primary key VARCHAR workarounds for the users and age_gender_bkts tables, as we did in section above.
Once this is done, we can generate random data for the other three tables with:
$ datafaker create-data
From now on, whenever we make a change to config.yaml, we should re-run these steps to see the effects:
Run
datafaker create-generators --config-file config.yaml --force.If necessary, perform any manual edits to
ssg.py.Truncate the non-vocabulary database tables with
datafaker remove-data --config-file config.yaml.Run
datafaker create-data.
Step 2. gets tedious to do every time, and in the next section we’ll show how to automate it.
To recap, vocabularies are tables that don’t need synthesising. By itself this adds only limited utility, since the interesting parts of the data are typically in the non-vocabulary tables, but it saves great amounts of work by fixing some tables with no privacy concerns to have perfect fidelity from the get-go. Note that one has to be careful in making sure that the tables marked as vocabulary tables truly do not hold privacy sensitive data, otherwise catastrophic privacy leaks are possible, where the original data is exposed raw and in full.
Specifying Row-based Custom Generators
As we’ve seen above, ssg.py is overwritten whenever you re-run create-generators.
To avoid having to manually edit ssg.py after each overwrite, we can specify “row generators” for various columns in the config file:
config.yaml:
 1tables:
 2  age_gender_bkts:
 3    num_rows_per_pass: 1
 4    row_generators:
 5      - name: generic.person.password
 6        columns_assigned: gender
 7      - name: generic.person.password
 8        columns_assigned: age_bucket
 9      - name: generic.column_value_provider.column_value
10        args: [dst_db_conn, orm.Countries, '"country_destination"']
11        columns_assigned: country_destination
12
13  users:
14    num_rows_per_pass: 1
15    row_generators:
16      - name: generic.person.password
17        columns_assigned: id
For instance, on lines 5-6 above we say that every time a row is generated for the agen_gender_bkts table, the generic.person.password function should be called (without arguments), and the output should be written to the gender column.
We similarly use generic.person.password to populate age_gender_bkts.age_bucket and users.id, and generic.column_value_provider.column_value (more on that one later) to populate country_destination.
The next time we run create-generators, these config-specified row generators will override the default ones and we will not need to edit the ssg.py manually any more.
You may notice in the above code block a few magical-seeming keywords, namely generic, dst_db_conn, and orm, that deserve an explanation.
genericis the object that is used to reference Mimesis providers, which you already met earlier.dst_db_connis a SQLAlchemy database connection object for the destination database. Generator functions can use it to for example fetch a random ID for a row in a different table, which is what thegeneric.column_value_provide.column_valuegenerator above does.ormis the module of theorm.pyfile.
These three and their fields are available to you to use as generator functions (the name field) or their arguments when writing a config file.
You can also use Python constants like constant numbers, strings, and None, although take care to wrap any constant strings in '"nested quotes"'.
We can also use row generators to add more fidelity to the data.
Examples include specifying that a column’s value should be an integer in a given range or should be chosen at random from a list of acceptable values.
We see below that we have used these techniques to populate the sessions.secs_elapsed column with random integers in the range 0-3,600 and sessions.action with any one of the three most common action types from the source dataset:
config.yaml:
 1tables:
 2  sessions:
 3    row_generators:
 4      - name: generic.numeric.integer_number
 5        kwargs:
 6          start: 0
 7          end: 3600
 8        columns_assigned: secs_elapsed
 9      - name: generic.choice
10        kwargs:
11          items: ["show", "index", "personalize"]
12        columns_assigned: action
Many simple needs are served by the plethora of Mimesis providers we can access through the generic object, but to go beyond what they offer, we can also write our own custom row generators.
These are written in a separate Python module and referenced in the configuration file.
For example, in the users table, we may want to ensure that the date_first_booking is optional and never comes before the date_account_created.
To accomplish this, we define a custom generator, which is a function that returns a tuple with two dates.
In this tuple, the second item may be None and always comes at least a calendar year after the first item:
airbnb_generators.py:
 1import datetime
 2from typing import Optional
 3
 4def user_dates_provider(generic):
 5    date_account_created: datetime.date = generic.datetime.date(start=2010, end=2015)
 6
 7    booking_date: Optional[datetime.date] = None
 8    if generic.choice([True, False]):
 9        booking_date = generic.datetime.date(
10            start=date_account_created.year + 1, end=2016
11        )
12
13    return date_account_created, booking_date
Then, we tell SSG to import our custom airbnb_generators.py and assign the return values of our generator function to the two columns in our users table:
config.yaml:
 1row_generators_module: airbnb_generators
 2
 3tables:
 4  users:
 5    num_rows_per_pass: 1
 6    row_generators:
 7      - name: generic.person.password
 8        columns_assigned: id
 9      - name: airbnb_generators.user_dates_provider
10        kwargs:
11           generic: generic
12        columns_assigned: ["date_account_created", "date_first_booking"]
Note how we pass the generic object as a keyword argument to user_dates_provider.
Row generators can have positional arguments specified as a list under the args entry and keyword arguments as a dictionary under the kwargs entry.
Limitations to this approach to increasing fidelity are that rows can not be correlated with other rows in the same table, nor with any rows in other tables, except for trivially fulfilling foreign key constraints as in the default configuration. We will see how to address this later when we talk about story generators.
This level of configuration allows us to make the data look much more plausible, especially when looked at locally on the level of individual rows.
The sessions.action column can have plausible actions rather than random strings, a session’s duration can be in a plausible range of numbers and users don’t make bookings before creating an account:
id |
date_account_created |
date_first_booking |
|---|---|---|
TK53EDBJ |
2011-10-21 |
|
BY13UILQ |
2015-04-12 |
2016-12-29 |
WA25VOAU |
2011-02-08 |
2013-07-03 |
YT49ANJT |
2015-11-16 |
Still there are no privacy implications, but data can be generated that e.g. passes various filters and WHERE clauses that one might realistically run on the data, opening new utility, especially in testing.
Using Aggregate Statistics from the Source Data
Beyond copying vocabulary tables, SSG allows for the original data to affect the synthetic data generation process only through a particular mechanism we call source statistics.
To use it, the user writes in the configuration file SQL queries that are executed on the source data, and their output is written into a file, typically called src-stats.yaml.
The file is both machine and human-readable, and its contents are available to be used as inputs into the custom generators we discussed above.
In principle this allows moving over arbitrary information about the source data, but using the source statistics feature with row-by-row queries is considered an anti-pattern. Rather, the queries should compute some aggregate properties of the source data: the mean and standard deviation of the values in some column, the average age of a person, a histogram of relative frequencies of pairs of values in two different columns, etc. By using the outputs of these queries as arguments in the custom generators one can, for instance, match uni- or multi-variate distributions between the source data and the synthetic data, such as setting the average age of the synthetic people to be the same as that in the real data.
In the AirBnB dataset, if we want to generate normally-distributed values with the right mean and standard deviation for the users.age column, we would define a config.yaml with the following content (on top of the configurations we wrote in the previous sections):
config.yaml:
 1src-stats:
 2  - name: age_stats
 3    query: >
 4      SELECT AVG(age)::float AS mean, STDDEV(age)::float AS std_dev
 5      FROM users
 6      WHERE age <= 100
 7
 8tables:
 9  users:
10    row_generators:
11      - name: airbnb_generators.user_age_provider
12        kwargs:
13          query_results: SRC_STATS["age_stats"]
14        columns_assigned: age
Let’s first focus on the src-stats block where we define what queries to run on the source data.
In this case we run only one, called age_stats, which you can see on lines 4 - 6.
With this added to your config.yaml you need run
$ datafaker make-stats --config-file config.yaml
which executes the query and writes the results to a src-stats.yaml file, which looks as follows:
src-stats.yaml:
1age_stats:
2- mean: 36.54434029695572
3  std_dev: 11.708339792587486
This is the output of the SQL query in YAML format.
To be able to use these numbers in our generators we need to regenerate ssg.py with
$ datafaker create-generators --config-file config.yaml --stats-file src-stats.yaml --force
The new option --stats-file src-stats.yaml makes it such that the SRC_STATS variable in ssg.py is populated with the concents of src-stats.yaml, allowing you to pass them to your generators as arguments, as we do above in the config.yaml snippet on line 13.
Note how the query name name: age_stats (line 2) is used in SRC_STATS["age_stats"] (line 13) to access the results of this particular query.
Finally, we need the custom generator function airbnb_generators.user_age_provider (line 11), whose content is the following:
airbnb_generators.py:
1import random
2
3def user_age_provider(query_results):
4    # The [0] picks up the first row of the query results. This is needed because all
5    # query results are always tables, and could in principle have many rows.
6    mean: float = query_results[0]["mean"]
7    std_dev: float = query_results[0]["std_dev"]
8    return random.gauss(mean, std_dev)
With that in place you can run
$ datafaker create-data
as usual, and your newly created rows fill have the correct distribution of ages.
Note the difference between this approach and some other approaches to synthetic data, such as those that use neural networks trained on the original data.
Here, the user has to manually specify exactly which statistical properties of the original data are extracted, and exactly how they are used to inform the synthetic data.
This means more manual work for the user, especially if many aspects of the synthetic data want to be matched with the original.
However, it provides complete transparency and control over how the original data is used, and thus over possible privacy implications.
One can look at the queries run to produce source statistics, and their outputs in the src-stats.yaml file, and if one is satisfied that publishing these results poses an acceptable privacy risk, then publishing any amount of synthetic data generated based on them can only pose less of a risk.
Differentially Private Source Statistics
Even if only aggregate statistics about the source data are used, they can still leak private information.
If for instance we would do a SELECT COUNT(*), gender FROM people GROUP BY gender query to find out the gender distribution of the people in our data, and if there were only a few people with “other” as their gender, their presence or absense in the dataset could be leaked by the aggregate query.
To protect against such privacy leaks, we can add differential privacy to our source statistics queries, which adds noise to the results to hide the effects of individuals.
For differential privacy, SSG uses a package called SmartNoiseSQL, that runs SQL queries and adds appropriate amounts of noise to the results to make them differentially private.
Here’s how you could add differential privacy to the above age-stats query:
config.yaml:
 1src-stats:
 2  - name: age_stats
 3    query: >
 4      SELECT age, id
 5      FROM users
 6      WHERE age <= 100
 7    dp-query: >
 8      SELECT AVG(age) AS mean, STDDEV(age) AS std_dev
 9      FROM query_result
10    epsilon: 0.5
11    delta: 0.000001
12    snsql-metadata:
13      max_ids: 1
14      id:
15        type: string
16        private_id: true
17      age:
18        type: float
19        lower: 0
20        upper: 100
The query is now done in two stages.
First, a regular SQL query, the one called query, is executed on the database, and the results are fetched to the memory of the machine that SSG is being run on, in a table called query_result.
Then a second query called dp-query is run on the table query_result, using SmartNoiseSQL (SNSQL), to compute aggregates in a differentially private way.
To be able to do this, we need to provide SmartNoiseSQL some extra information:
epsilonanddeltaare the parameters that control the strength of the differential privacy guarantee.The
snsql-metadatablock holds information about the columns inquery_result. There must always be one column marked withprivate_id: trueto be the one that identifies the “unit of privacy”, e.g. individual people. Data types must also be provided for all columns, and for numerical columns a minimum and maximum values that they can take are needed. Please refer to the SmartNoiseSQL documentation for a detailed explanation of all the parameters available and their meaning.
Through the robustness to post-processing property of differential privacy, if the values in src-stats.yaml are generated in a differentially private way, the synthetic data generated based on those values can not break that guarantee.
To learn more about differential privacy and the meaning of its parameters, please read this white paper from Microsoft.
At the time of writing, SmartNoiseSQL is somewhat limited in the kinds of queries it can run.
For instance, joins and subqueries are not possible.
This is why it is typically necessary to do some preprocessing of the data in the query before the differentially private aggregation, usually an AVG, a SUM or a COUNT, is done in dp-query.
Apart from splitting the src-stats query into the query and dp-query parts and adding the SNSQL metadata, nothing else has to change:
You still run make-stats as usual to generate a src-stats.yaml.
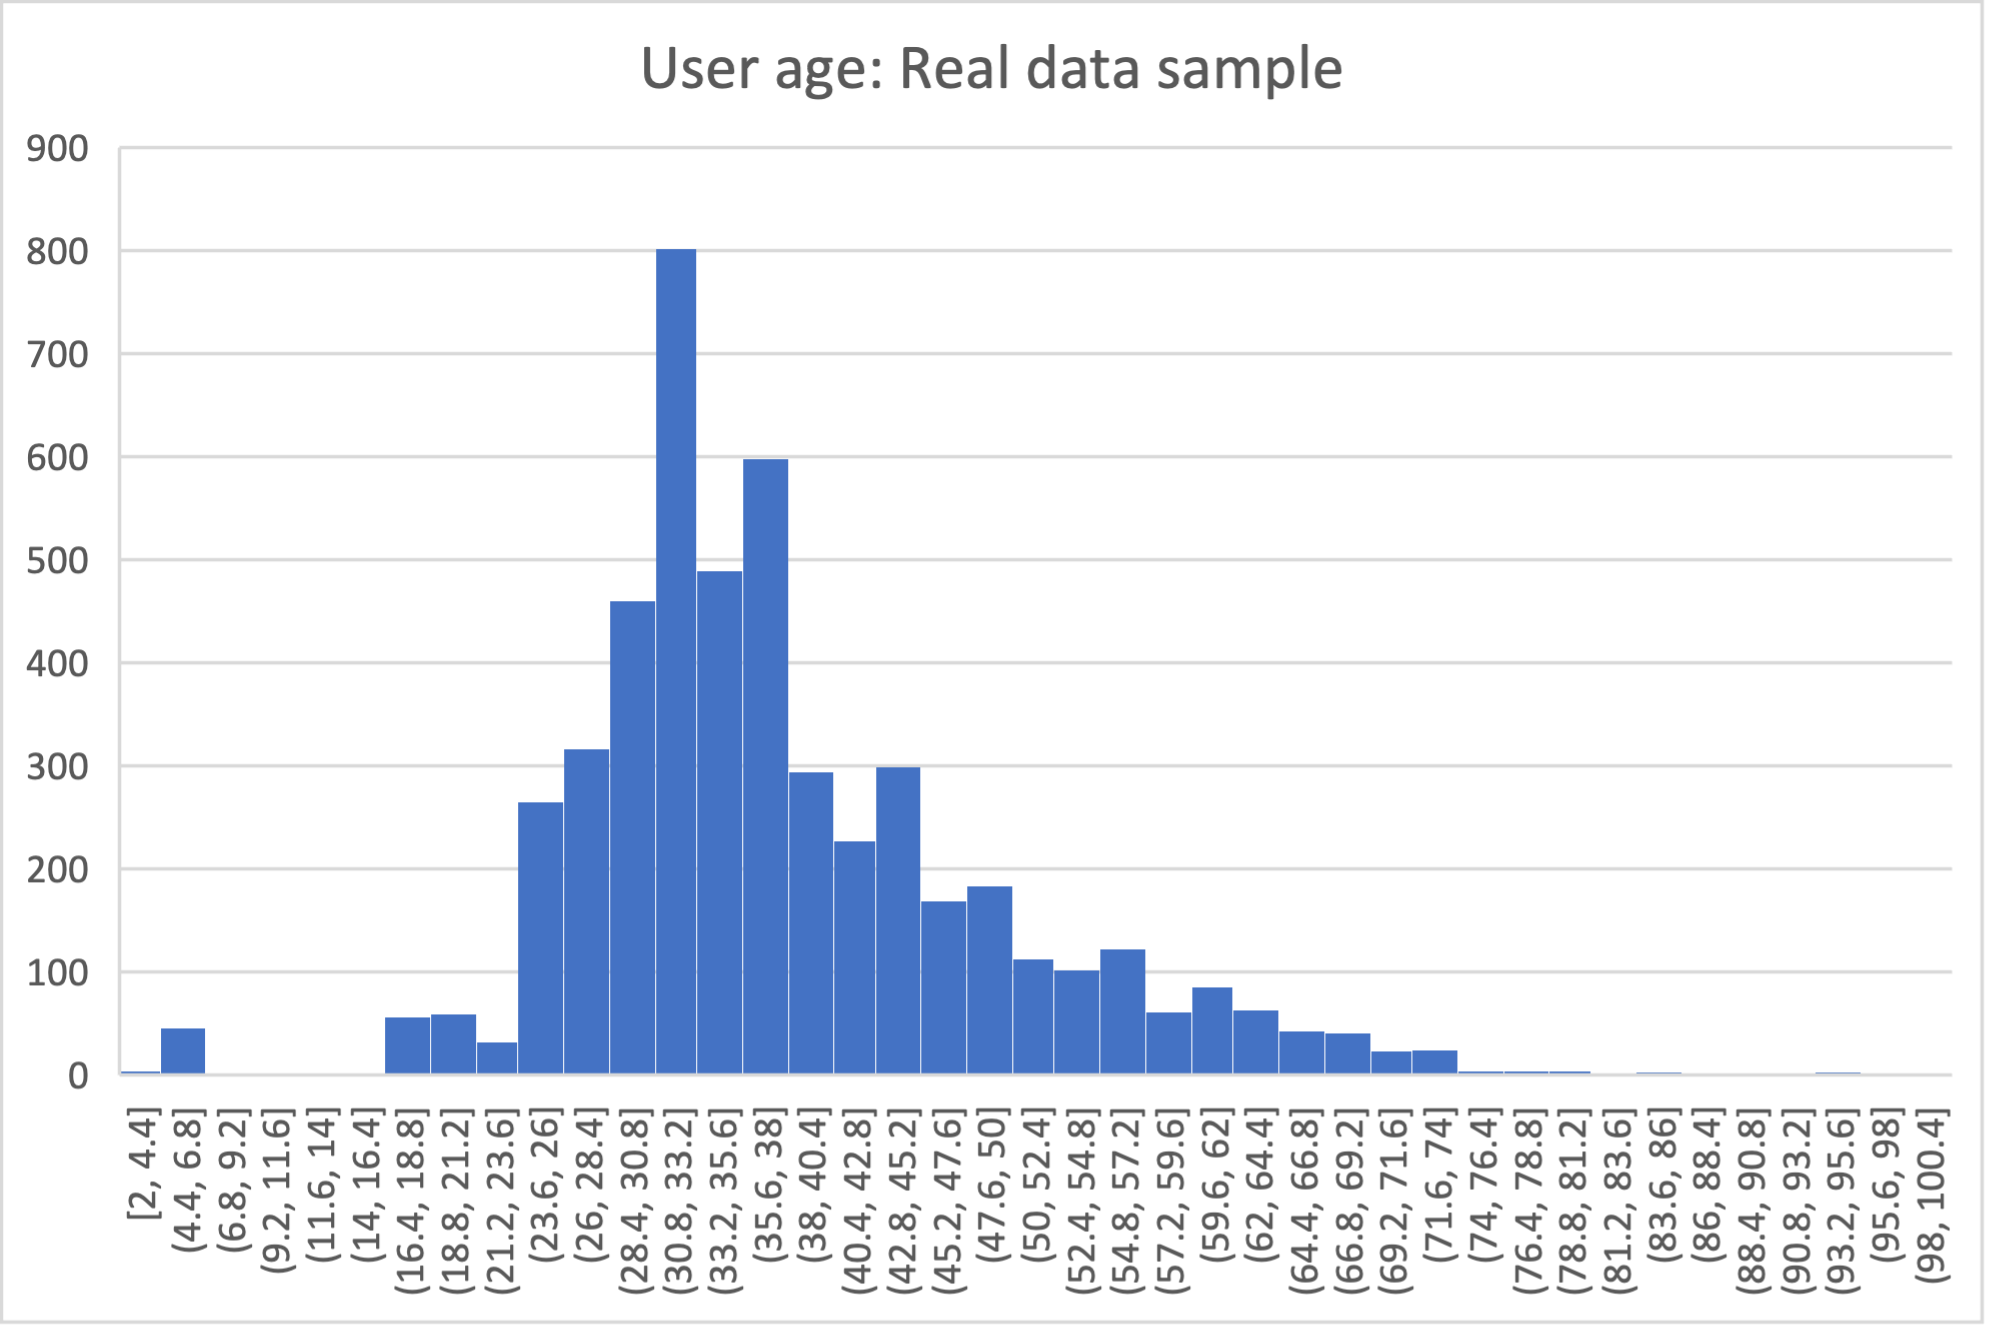
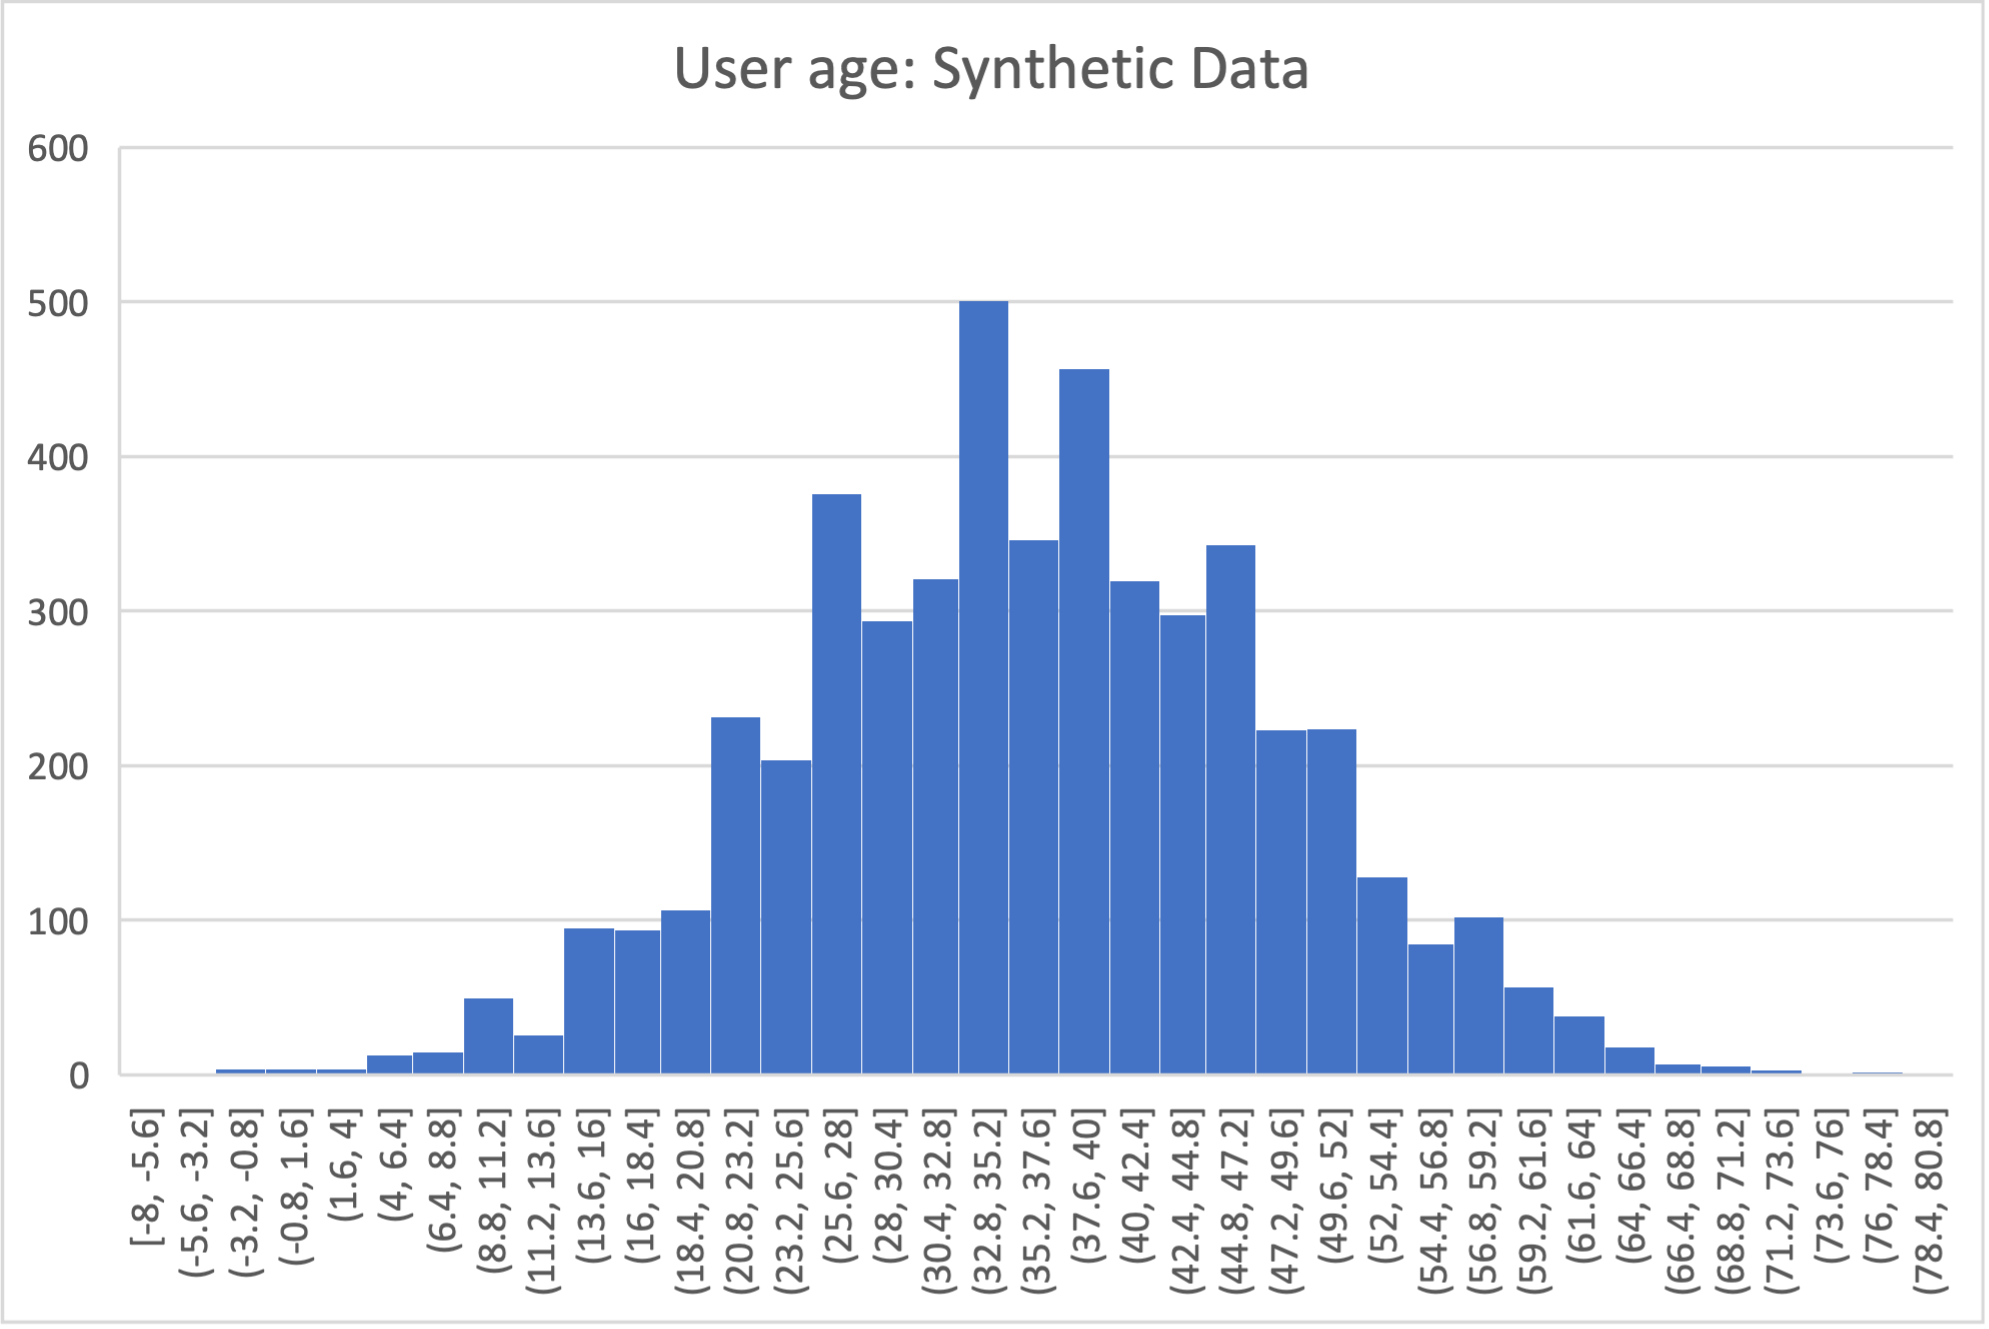
Below is an example of the kind of fidelity one can obtain by combining custom row generators with source statistics queries.
raw vs synthetic ages histogram:
One final aspect of source statistics bears mentioning:
At the top level of config.yaml one can also set use-asyncio: true.
With this, if there are multiple source stats queries to be run, they will be run in parallel, which may speed up make-stats significantly if some of the queries are slow.
Stories Within the Data
The final configuration option available to users of SSG is what we call story generators. These address generating synthetic data with correlations that bridge different tables and multiple rows.
A story generator is a Python generator (an unfortunate clash of terminology: Python uses the term “generator” to refer to objects that yield multiple values in a sequence), written by the user, that yields rows to be written into the synthetic database.
For instance, it may first yield a row specifying a person in the users table, and then multiple rows for the sessions table that specify various browsing sessions this user has had:
airbnb_generators.py:
 1import random
 2
 3def sessions_story():
 4    """Generate users and their sessions."""
 5    device_types = ["Mac Desktop", "Windows Desktop", "iPhone"]
 6
 7    # a new user will be sent back to us with our randomly chosen device type
 8    user: dict = yield (
 9        "users",  # table name
10        {
11            "first_device_type": random.choice(device_types)
12        }  # see 1. below
13    )
14
15    # create between 10 and 19 sessions per user
16    sessions_per_user: int = random.randint(10, 20)
17
18    for _ in range(sessions_per_user):
19        if random.random() < 0.8:
20            # most often, the session is from the user's sign-up device...
21            yield (
22                "sessions",
23                {
24                    "user_id": user["id"],  # see 2. below
25                    "device_type": user["first_device_type"],
26                }
27            )
28        else:
29            # ...but sometimes it is from any device type
30            yield (
31                "sessions",
32                {
33                    "user_id": user["id"],
34                    "device_type": random.choice(device_types)},
35            )
Three features make story generators more practical than simply manually writing code that creates the synthetic data bit-by-bit:
When a story generator yields a row, it can choose to only specify values for some of the columns. The values for the other columns will be filled by custom row generators (as explained in a previous section) or, if none are specified, by SSG’s default generators. Above, we have chosen to specify the value for
first_device_typebut the date columns will still be handled by ouruser_dates_providerand the age column will still be populated by theuser_age_provider.Any default values that are set when the rows yielded by the story generator are written into the database are available to the story generator when it resumes. In our example, the user’s
idis available so that we can respect the foreign key relationship betweenusersandsessions, even though we did not explicitly set the user’sidwhen creating the user on line 8.
To use and get the most from story generators, we will need to make some changes to our configuration:
config.yaml:
 1tables:
 2  ...
 3  users:
 4     num_rows_per_pass: 0  # see 1 below
 5     ...
 6
 7  sessions:
 8     num_rows_per_pass: 0  # see 1 below
 9     ...
10
11story_generators_module: airbnb_generators  # see 2 below
12
13story_generators:
14  - name: airbnb_generators.sessions_story
15    num_stories_per_pass: 30  # see 3 below
By default, story generators will run in addition to the usual process that generates data row-by-row independently for each table, the process that we’ve been using so far when running
create-data. Often we don’t want this for the tables that the story generators generate data for, so in our case we setnum_rows_per_pass: 0forusersandsessions. We could keep these >0 if we wanted a mix of row-by-row and story-generated users and sessions.We specify the module that contains our story generators. In this case, it is the same Python file as the row generators.
We specify that we have one story generator and that it will be called 30 times. Note that, unlike row generators, the story generator is not linked to any particular table as it specifies the table name whenever it
yields.
After editing the config.yaml and airbnb_generators.py as above, you can run:
$ datafaker create-generators --config-file=config.yaml --stats-file=src-stats.yaml --force
This will regenerate the ssg.py file to incorporate your story generator, and running create-data as usual will then create some storied users and sessions.
Story generators allow for nearly unlimited fidelity if enough work is put in to write them.
Above, we have created a correlation between only two tables but one can create arbitrary correlations between many tables and variables, including complex time series such as a patient’s test results or a customer’s orders.
An example of this can be seen in our health data example use case.
This opens utility far beyond simple pipeline testing or showcasing, including fitting statistical models to the synthetic data that could perform non-trivially well on the real data.
The output of the source statistics queries are available as arguments for the story generators, just like they are for the custom row generators.
Thus the synthetic data generated can be made to match the original data in whatever ways are desired.
The only significant limitation is that referencing or updating rows created before the current story was run is not easy (although not impossible either, by using the dst_db_conn object).
Note that we make here the same trade off as we did before: generating very high fidelity data requires significant effort on the user’s part, in writing the Python code for any story generators that are needed, and any source statistics SQL queries needed to inform those generators of properties of the original data. This is in contrast with other more automated synthetic data generators, such as GANs, which automatically learn various features of the source data and try to replicate them. However, what we gain are:
Full transparency and control over the ways in which the source data is utilised, and thus the ways in which privacy could in principle be at risk, including easy implementation of differential privacy guarantees.
The possibility of starting from very low fidelity data, and incrementally adding fidelity to particular aspects of the data, as is needed to serve the utility of whatever use case the synthetic data is created for.
Examples of the complete files generated by the tutorial can be found at: /datafaker/examples/airbnb.